From Light to Dark: High-Key and Low-Key Lighting in Portrait Photography
Turn on the lights! Depending on lighting, portraits can run a gamut of fun, bright, light, airy and upbeat to dark, moody, serious, mysterious and dramatic. This is why studio lighting can be intensely difficult for some and fun for others. How you light a portrait can make or break the image, so it’s important not only to do it, but to do it well. I wanted to focus on a couple of creative lighting styles used not only in portraits, but in fashion, beauty and even television and film. So let’s get to the studio!
High-key is a lighting style that is a results in little-to-no shadow on your subject, based on the level of brightness of your lights hitting a subject. High-key is based on lighting ratios. It’s not a lighting pattern – which is based on light direction. Many lighting patterns can work for high key lighting so long as there is minimal to no shadows. High-key lighting can be achieved when your fill light(s) project(s) the same level of brightness as your key light to fill in shadows. This creates a 1:1 ratio eliminating all shadows. We’ll discuss high-key more in depth in just a moment, but for now, let’s jump into lighting ratios to get a better understanding of high-key lighting later.
LIGHTING RATIOS
Before we move into key lighting, it’s important to understand how to achieve high-key and low-key lighting, which involves knowing and understanding a little bit about lighting ratios. I go into great detail on lighting ratios in my article: Understanding and Using Lighting Ratios in Studio Portraiture. I encourage you to take a look at that article to get a better understanding of the math and tools behind some impressive lighting techniques.
Lighting ratios are basically the mathematical ratio relation of light that falls onto a subject between two light sources, typically a key light on the highlight side and fill light on what would be the shadow side.
HIGH-KEY LIGHTING
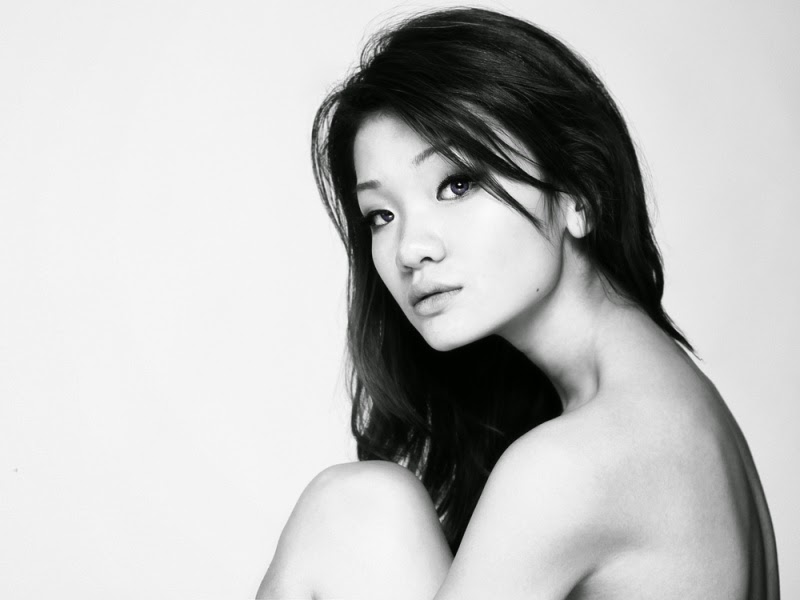
High key lighting is a lighting style that results in low contrast and soft shadow transition through the use of a lot of soft, diffused light. Sometimes photographers slightly overexpose an image as an artistic choice with this type of lighting, but do not confuse high-key lighting and a just plain ole’ blown out image. A light, bright and airy image of a subject containing a true black point (such as the pupil of an eye or a subject’s eyebrows or eyelashes) or some form of contrast is often a good mark for the image to be high-key whereas an overexposed image will not show a true black at all.
Fashion and beauty photographers often use high key lighting since the extreme amount of soft light and lack of shadows flatter a subject’s features. Pores and wrinkles are eliminated by this form of beauty lighting.
Capturing a High-Key Image
High-key lighting is generally achieved by having a key light and a fill light, opposite each other, with the key light set twice as bright as the fill light. In addition, you will want to have two lights set at 45 degree angles illuminating the background. I have also found that one background light hitting the background directly behind the subject to also work well in this type of lighting style.
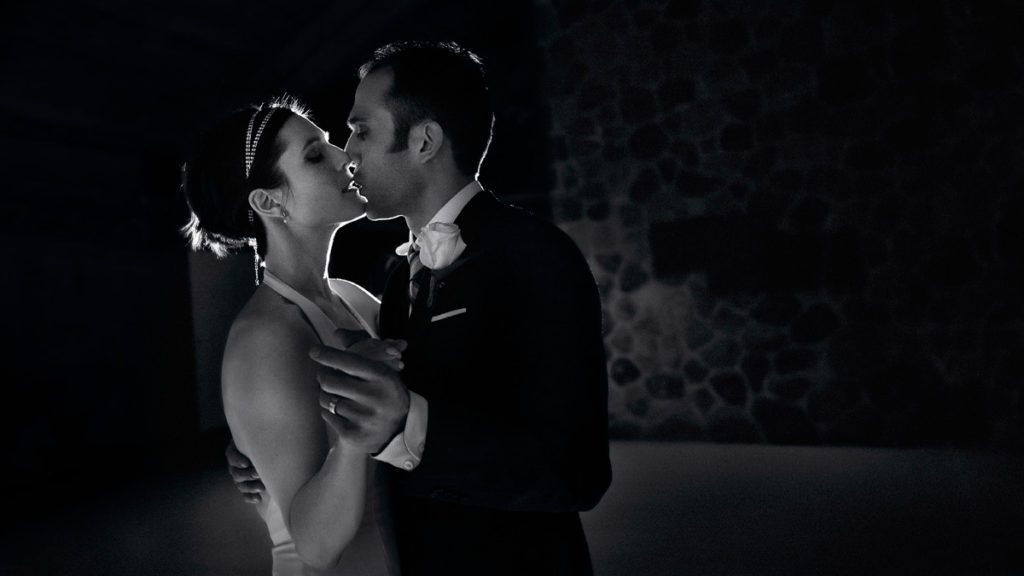
LOW-KEY LIGHTING
“Low key” lighting is a more dramatic form of lighting that focuses on form and shadow. It is typically a darker image where the focus can be on part of your subject whether it’s their face, a body part or a certain amount of their whole body. It can be much more interesting when adding a little bit of rim lighting behind your subject.
You’ll find low key lighting used a lot in television and movies to relate the feeling of mystery and darkness of characters.
What is Needed for Low-Key Lighting?
For low key lighting, you’ll want a dark background to start. I generally like to simplify and use black or gray seamless paper, though those shades will also work well in muslin and other background choices too. I like to use two light sources for my low-key lit portraits: one for my key light for use on my subject’s face and one for a rim light behind my subject.
Modifiers
What type of modifiers work well for low-key lighting? Since you want light to hit only a certain area of your subject and not let light spill all over the place, a modifier with controlled directionality is generally needed for either your front light, your back light or both light sources depending on the result you are going for. When shooting a portrait, especially that of a woman where low-key lighting may not be the most flattering, I generally like to use a softbox or beauty dish with a sock positioned close to the face for the front of my subject to soften the light, thereby filling in light in shadow areas instead of showing every flaw. For the rim light, I would use a beauty dish with a grid, or a snoot (with a grid), depending on what modifiers I have on hand. The grid or snoot placed directly behind your subject and inline with the softbox in front – aids in controlling light spill and to keep light flowing in one direction with virtually no spill.
How To Capture a Low-Key Image
For the example image of my model Celeste below, I used a softbox for the frontal lighting at a 45 degree angle from where I was standing with the camera and I used a beauty dish with a grid behind her as a rim light. I had Celeste standing in front of black background paper to make it easier for me to achieve the darker background needed for the low-key image. If using anything other than a grid, you may also need a black flag positioned to the side of your subject where the rim light is located to control light spill from hitting your camera.
WHEN IT COMES DOWN TO IT…
Lighting doesn’t have to be a stressful tool to use when composing images. When it comes down to it, there are a plethora of ways to light an image. I hope that you’ll incorporate – or at least try – these and other lighting techniques to see what amazing results you can create.